Renaming of customer numbers in bulk in Business Central
One of the most common real-world challenges faced by Business Central consultants and developers is the need to rename customer numbers in bulk — especially after a company migrates from a legacy ERP system, standardises its customer numbering format, or restructures its accounts. In standard Business Central, renaming a single customer number is possible through the Customer Card, but there is no built-in mechanism to rename hundreds or thousands of customer numbers in one operation.
Attempting to do this manually is time-consuming, error-prone, and simply not practical in production environments. In this article, we will walk through a complete end-to-end implementation for bulk renaming customer numbers in Business Central.
Step :- 1. Create a buffer table with following details –
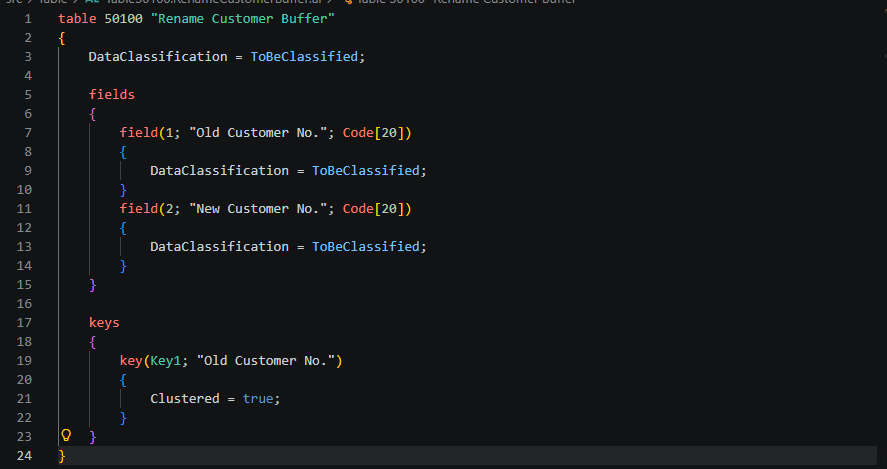
table 50100 "Rename Customer Buffer"
{
    DataClassification = ToBeClassified;

    fields
    {
        field(1; "Old Customer No."; Code[20])
        {
            DataClassification = ToBeClassified;
        }
        field(2; "New Customer No."; Code[20])
        {
            DataClassification = ToBeClassified;
        }
    }

    keys
    {
        key(Key1; "Old Customer No.")
        {
            Clustered = true;
        }
    }
}
Step 2 :- Create a List page for showing old and new customer numbers –

page 50101 "Rename Customer Buffer"
{
    PageType = List;
    ApplicationArea = All;
    UsageCategory = Lists;
    SourceTable = "Rename Customer Buffer";

    layout
    {
        area(Content)
        {
            repeater(GroupName)
            {
                field("Old Customer No."; Rec."Old Customer No.")
                {
                    ApplicationArea = all;
                }
                field("New Customer No."; Rec."New Customer No.")
                {
                    ApplicationArea = all;
                }
            }
        }
    }
Step 3 :- Now for mapping entry data of old and new customers we will prepare a excel uploader for template use with action button –
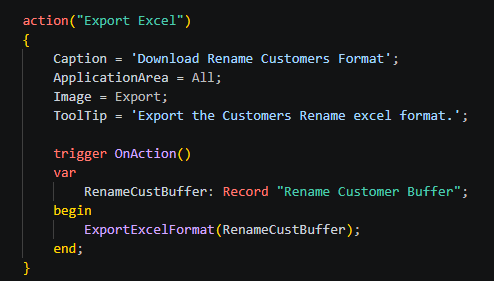
action("Export Excel")
            {
                Caption = 'Download Rename Customers Format';
                ApplicationArea = All;
                Image = Export;
                ToolTip = 'Export the Customers Rename excel format.';

                trigger OnAction()
                var
                    RenameCustBuffer: Record "Rename Customer Buffer";
                begin
                    ExportExcelFormat(RenameCustBuffer);
                end;
            }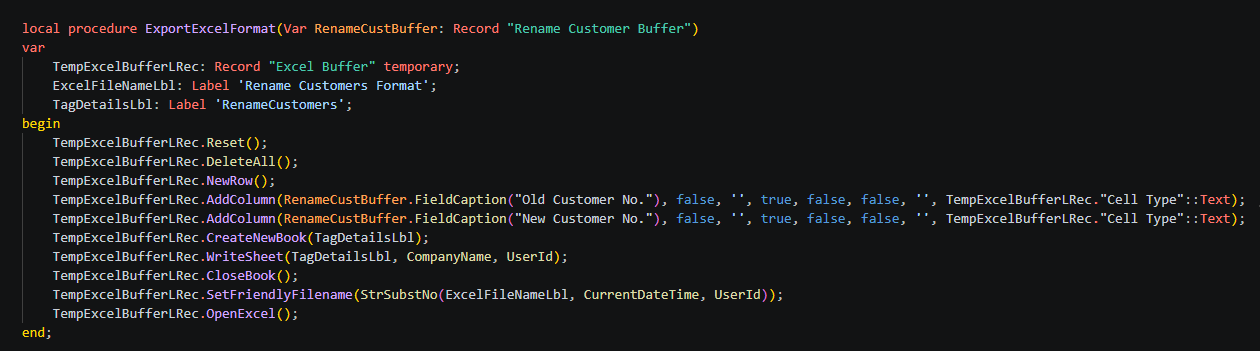
local procedure ExportExcelFormat(Var RenameCustBuffer: Record "Rename Customer Buffer")
    var
        TempExcelBufferLRec: Record "Excel Buffer" temporary;
        ExcelFileNameLbl: Label 'Rename Customers Format';
        TagDetailsLbl: Label 'RenameCustomers';
    begin
        TempExcelBufferLRec.Reset();
        TempExcelBufferLRec.DeleteAll();
        TempExcelBufferLRec.NewRow();
        TempExcelBufferLRec.AddColumn(RenameCustBuffer.FieldCaption("Old Customer No."), false, '', true, false, false, '', TempExcelBufferLRec."Cell Type"::Text);
        TempExcelBufferLRec.AddColumn(RenameCustBuffer.FieldCaption("New Customer No."), false, '', true, false, false, '', TempExcelBufferLRec."Cell Type"::Text);
        TempExcelBufferLRec.CreateNewBook(TagDetailsLbl);
        TempExcelBufferLRec.WriteSheet(TagDetailsLbl, CompanyName, UserId);
        TempExcelBufferLRec.CloseBook();
        TempExcelBufferLRec.SetFriendlyFilename(StrSubstNo(ExcelFileNameLbl, CurrentDateTime, UserId));
        TempExcelBufferLRec.OpenExcel();
    end;
Step 4 – Now we will import excel sheet (exported in steps 3 after data filled) and upload it by action button for renaming all customers –
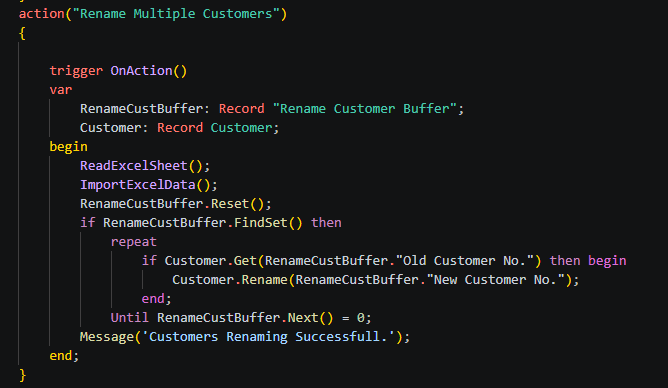
action("Rename Multiple Customers")
            {

                trigger OnAction()
                var
                    RenameCustBuffer: Record "Rename Customer Buffer";
                    Customer: Record Customer;
                begin
                    ReadExcelSheet();
                    ImportExcelData();
                    RenameCustBuffer.Reset();
                    if RenameCustBuffer.FindSet() then
                        repeat
                            if Customer.Get(RenameCustBuffer."Old Customer No.") then begin
                                Customer.Rename(RenameCustBuffer."New Customer No.");
                            end;
                        Until RenameCustBuffer.Next() = 0;
                    Message('Customers Renaming Successfull.');
                end;
            }
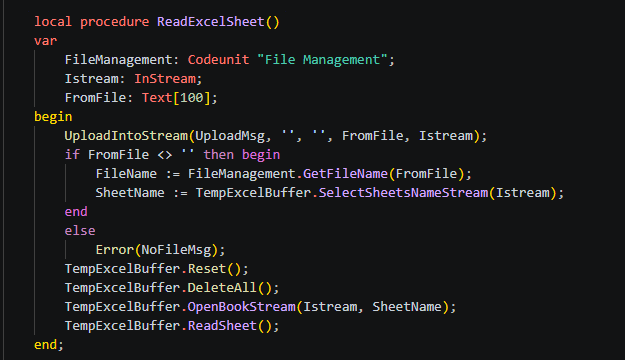
local procedure ReadExcelSheet()
    var
        FileManagement: Codeunit "File Management";
        Istream: InStream;
        FromFile: Text[100];
    begin
        UploadIntoStream(UploadMsg, '', '', FromFile, Istream);
        if FromFile <> '' then begin
            FileName := FileManagement.GetFileName(FromFile);
            SheetName := TempExcelBuffer.SelectSheetsNameStream(Istream);
        end
        else
            Error(NoFileMsg);
        TempExcelBuffer.Reset();
        TempExcelBuffer.DeleteAll();
        TempExcelBuffer.OpenBookStream(Istream, SheetName);
        TempExcelBuffer.ReadSheet();
    end;
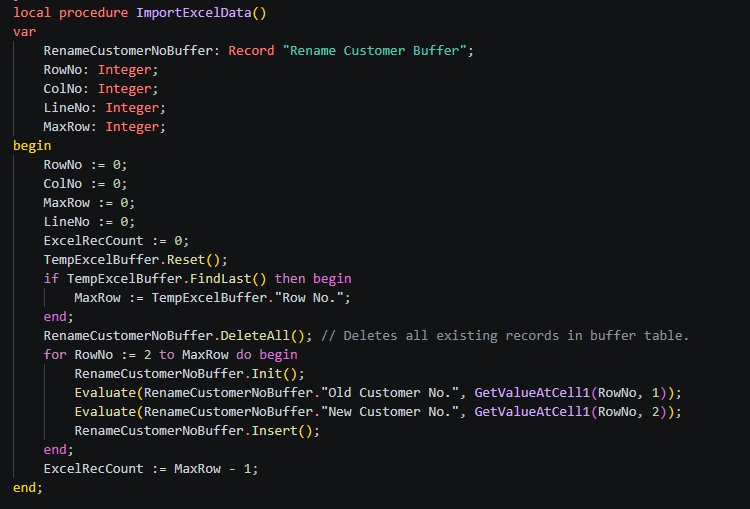
 local procedure ImportExcelData()
    var
        RenameCustomerNoBuffer: Record "Rename Customer Buffer";
        RowNo: Integer;
        ColNo: Integer;
        LineNo: Integer;
        MaxRow: Integer;
    begin
        RowNo := 0;
        ColNo := 0;
        MaxRow := 0;
        LineNo := 0;
        ExcelRecCount := 0;
        TempExcelBuffer.Reset();9
        if TempExcelBuffer.FindLast() then begin
            MaxRow := TempExcelBuffer."Row No.";
        end;
        RenameCustomerNoBuffer.DeleteAll(); // Deletes all existing records in buffer table.
        for RowNo := 2 to MaxRow do begin
            RenameCustomerNoBuffer.Init();
            Evaluate(RenameCustomerNoBuffer."Old Customer No.", GetValueAtCell1(RowNo, 1));
            Evaluate(RenameCustomerNoBuffer."New Customer No.", GetValueAtCell1(RowNo, 2));
            RenameCustomerNoBuffer.Insert();
        end;
        ExcelRecCount := MaxRow - 1;
    end;
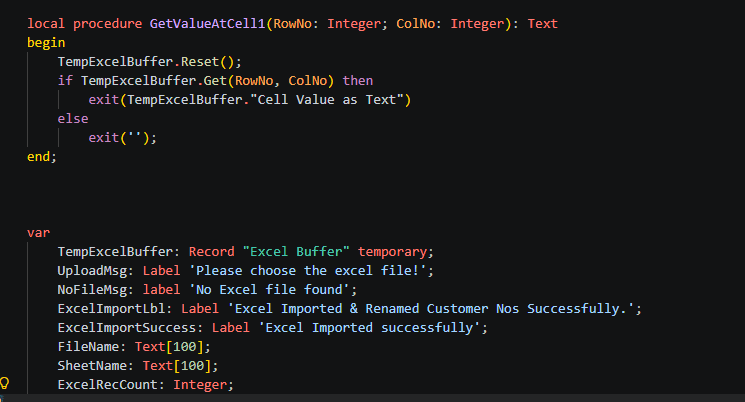
 local procedure GetValueAtCell1(RowNo: Integer; ColNo: Integer): Text
    begin
        TempExcelBuffer.Reset();
        if TempExcelBuffer.Get(RowNo, ColNo) then
            exit(TempExcelBuffer."Cell Value as Text")
        else
            exit('');
    end;


    var
        TempExcelBuffer: Record "Excel Buffer" temporary;
        UploadMsg: Label 'Please choose the excel file!';
        NoFileMsg: label 'No Excel file found';
        ExcelImportLbl: Label 'Excel Imported & Renamed Customer Nos Successfully.';
        ExcelImportSuccess: Label 'Excel Imported successfully';
        FileName: Text[100];
        SheetName: Text[100];
        ExcelRecCount: Integer;
In this article, we built a complete bulk customer rename solution for Microsoft Dynamics 365 Business Central using AL objects. This solution handles the complexity of BC’s referential integrity automatically through the `Rename()` function, provides validation before execution, gives users a clean interface
To get more such useful information, please follow our LinkedIn page and you can also subscribe our you tube page.
YouTube Link: https://www.youtube.com/@bizcentralorbit
LinkedIn Link: https://www.linkedin.com/company/bizcentralorbit/posts/?feedView=all
If you want to book a 1-to-1 live session with any of our expert consultants then click the link: https://bizcentralorbit.com/#One-to
If you want to read next blog “Automating Customer Ledger Apply Entry/Knock‑Off in Business Central Using Excel Bulk Uploader” then click the link: https://bizcentralorbit.com/blog-automating-customer-ledger-apply-entry-knockoff-in-business-central-using-excel-bulk-uploader/
If you want a Tutorial videos of “How to create Sales Order in Business Central” then click the link: https://www.youtube.com/watch?v=1jHLtuLFqVY&t=1s
Raise a support ticket instantly by clicking the link: https://bizcentralorbit.com/contact-us/
Very useful article for anyone working with Dynamics 365 and Business Central.
This content is concise but still manages to cover all the important points.
This article explains the concept in a very clean and understandable way.
I like how the post focuses on solving actual business challenges.
Helpful breakdown of a topic that’s usually difficult to explain.
This content is highly relevant for professionals working on Dynamics projects.
Very solid guide for understanding the feature in a business context.
I appreciate how clearly the key points are highlighted.
Exciting to see AI transforming enterprise security